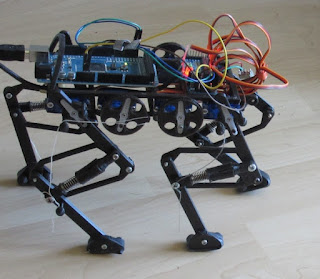
All of the pieces are in place, and now the walking trials, tuning, and real work begins. In the video, you can see the current iteration of robot and code. I removed the heavy tether and replaced the power sources. With the lighter power tether, it is just about walking. Sure there are some slips and a lot of falls. But, in this video you can see it make a few strides and move itself under its own motion!
 |
| Mojo Current Config, with power supply |
- Robot Chassis is 3D Printed: Servo and Control Frame, 4x Legs - with 4 linkages and a self made Serial Elastic Actuator, thread, springs and metal rods and screws from a salvaged printer.
- 8x 9g SG90 type micro Servos
- PCA9685 16-channel servo control board
- Arduino Mega 2650 micro controller
- Power: 9v transistor for Arduino board, 5v 2amp Power bank for servos
- Other Salvage: power switch, 9v transistor connector, barrel jack, USB cable, pieces of rubber from bicycle tub, etc. :)
 |
| Quadurped ready to walk! |
 |
| Mojo back top view |
There was a lot of "weakness" from the Left Hind servo. It felt hot to the touch - so pretty my burnt out that motor. This was the second failed servo. These are cheap servos, so I am expecting to go through them. (need to place another order).
The back legs have slippage and do not seem to be getting a full swing. I did identify some bad parameter setting in my code, and that seemed to help. I also increased the pull on the knees. for the swing phase, I will increase the distance from 50 degrees to 80 degrees. I am hoping this provides more momentum forward and lefts the back up more.
Need sticky feet to help with the sliding. maybe even change up the size of the front/hind legs. But, the next big changes coming will be in the chassis frame. it will be much bigger, have rollbars, a second deck to raise the knee servos, and have space for a control panel for switches, an interupt, and status led. It was printing while this version was walking (you could hear it in the back ground!)
 |
| Next version of the robot frame (CR-10 3D Printer) |
No comments:
Post a Comment