Sunday, July 26, 2020

Tilt! - A Balancing Robot (#4) - Engineering the Wheel Mount


Perhaps this takes a little more thought than I first expected.  I am trying to build this robot using scrap parts from printers, standard components, and in this case the bearings and axels from a pair of inline skates. WELL... that lead to some issues with the wheel mount. Today, I am re-engineering this design and building the wheel mount.

First attempt to test the motor, belt and pulley

Here is are the parts. I was trying to rig them up to quickly test how much backlash I would get from the old printer motors and belts.  However, the axel and wheel were so wobbly that I could not make it work.  (In addition, my plans to use a piece of scrap pressed steel to attach the motor are dashed - I do not have the necessary tools to cut large holes in the steel.  so back to the 3D printer!!) Also, you will see, I am re-using the printer's belt drive. This is about 70cm in length.

Wheel, bearing, and axel from an in-line skate wheel

The design problem is how to use the already dimensioned Axel and Bearings. Since I am reusing this part, I must work around it's length. It is longer than what I will need. In addition to this concern, I will need a way to secure the axel to the base and wheel mount of the Tilt robot. This is not typically a problem with balancing robots that us stepper motors since they have more direct control of the wheel. However, I firmly believe that the weight of the robot should not be directly applied to the motor. Thus I am using bearing and separating the load from the motor.

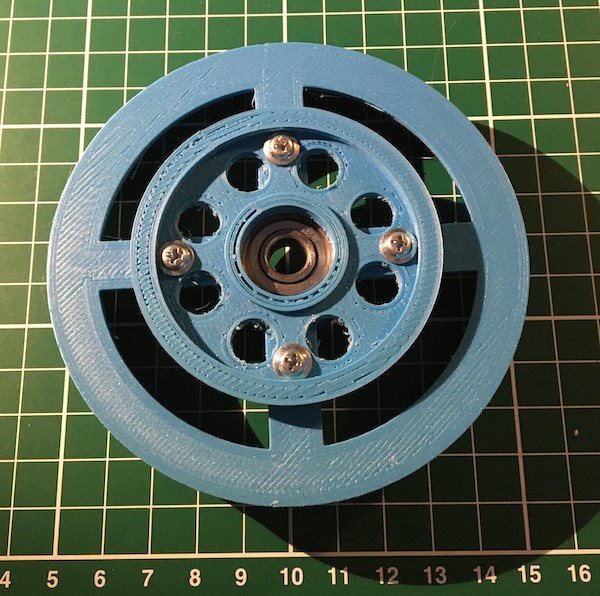
Checking the alignment (modulus) of the belt and the 3D printed pulley

I sketched out the arrangement of the bearings and spacers and axel. It is necessary to 'plug' the bearing into both the wheel/pulley. While redesigning this aspect of the wheel, I took the time to inspect the belt to make sure the pulley's teeth aligned with the belt. This is based on the modulus I calculated. It seems to match.

On the frame side, i repeated the bearing housing, creating a mount that holds the bearing but provides freedom for the axis.  I am sure this will have another review in future robot designs. After printing, I will test out this new design.

Tilt - Wheel base design (in red) - OpenSCAD

For the frame, I am still unsure what materials I will use for the 30cm between the wheel axel and the motor. since I do not know, yet, I designed a simple 3D printed frame with 10mm separate holes for M3 bolts. With this design I will have the flexibility to use anything, and just bolt that to the structure.

Next Steps:

The next steps are to print out the new design and assemble a single wheel for testing. this structure will allow me to clamp the wheel to the table and test the tension on the motor. I will be looking at how much backlash or slipping the belt will have.

The next physical design step will be to find a way to connect the motor mount to the wheel mount.

Update:

Here is the printed wheel mount.  The scrap steel would not work very well. I currently lack the tools to shape it and bore holes through to attach to the motor mount. 

I did have two rods of medium length from printers I salvaged.  With the ability to print out parts, I printed a rod mount. The mount is adjustable using the rubber rollers that are already on the steel rods. (now i just need two more for the other side!)

A workable prototype for one side of the balancing robot

Monday, July 20, 2020

Tilt! - A Balancing Robot (#3) - Shaping up the prototype design


The parts are sitting on the workshop surface, at least most of them. I thought I had some blockers in the sense that I *thought* I would need to have an encoder to make this work. Now, it occurs to me that the control system doesn't really care how much the wheel has turned, it will be controlling completely on the feedback from the motion sensor!  of course!

Finding a good wheel and drive mechanism has been blocking me. This is starting to take some shape in my head/design (at least for the the prototype).  I will be using 2, 12-18v brushed DC motors from recycled printers. The motors have a nylon 'pulley' on the spindle that is used to drive a notched belt from the printer.  I have found the belts in my pile of parts.(!) The belts solve two problems - 1) I will be able to step down the rotational rate of the motor, and 2) I will be able to directly drive the wheels.

Tilt - drafting out ideas on paper first -> then to OpenSCAD

I sketched out my thoughts above. Here you can see the motor I am planning on using including the nylon pulley.  I counted the number of teeth (Zahn) on the pulley. You can calculate out the modulus of the pulley gear by dividing the reference diameter (7mm) by the number of teeth (24). Thus I am using the modulus of 0.3 in my designs.  Als on the right is the belt I plan on using - also from a recycled printer.  below you can see my first attempts to test-print a pulley of modulus 0.3!

First attempt to print at m=0.3, the gcode was not precise enough. I reduce the extruded width for external walls to 50% and this helped considerably.


On to new challenges

I have no wheels that I would like to use for this prototype. given the need for a 3D printed spindle for the belt, it might be best just to custom design and print the wheels as well. Then I can integrate the spindle for the belt, a wheel of good size (10cm diameter) and integrated bearing.  From the draft above on paper, I made this concept on OpenSCAD.


The green portion will be the wheel. It has a very wide hub designed to be fitted with a skate bearing. The Yellow portion will be the pulley for the belt. It will be screwed to the side wall of the wheel. The hub of the pulley is slightly smaller than the wheel to lock in the bearing.

3D Printing

Here are the results of the design, printed.  It took some test prints to get the resolution correct for the fine detail of the pulley.

Tilt - 3D printed wheel and pulley for balancing robot

Tilt - 3D printed wheel and pulley for balancing robot

Next Steps:


I am looking now for a piece of metal about 30+ cm long that I can fabricate into the leg of the balancing robot. These recycled printer motors need to have something thin and strong to bolt into. this can be achieved with 3D printing - but I think metal will be a better solution. 

Once the leg material can be found, I will be testing the pulley, motor, and tensioning. I have to be careful of any slippage of the belt.

Saturday, July 11, 2020

Minions!

A Dream of Totally-Not-Evil-Robot-Army Minions!!


Minions - and not the D'zney ones!  Every Mad Scientist needs them.  Especially if you are going to build a robot army. Minions can be the foundation for any robot army, the very lowest of the 'foot soldiers'. What would be the robot equivalent?  Perhaps the most simplest robot configuration. In 'Agile' speak: the Minimal Viable Robot?

Robotic Minion with a Manipulator Arm

The Minimal Viable Robot, would have the minimal number of parts, and be the easiest to replicate. It could be small, one would say Miniature. A minimal, miniature robot - the first one in the Robot Army.  It will be a Min-i-on, and mini-one, a Mini1!

Lets build it!!  Because this Robot Army needs many many more robots!  It needs Mini1s!!

Mini1 sketches

Design


What is the bare-bones, minimalist robot, that still has some kick?  I would propose:

  • 2 Wheels
  • 2 Small Motors
  • a Motor Controller
  • Microcontroller
  • and a Battery

That sounds really basic. but, if it is going to do something - like to serve butter - in needs at least a sensor and a manipulator.

Here are some parts I have laying around the Totally Not Evil Robot Army Lab. This is a really cheap build with these parts. The Wheels are from an old printer. The motors came off of a chotsky fan I collected from a trade fair. The motor driver is a little overkill L298N but will do the job. The microcontroller is a Arduino Pro Mini (clone) about $5. and for power perhaps this battery bank battery 5V.  For a sensor, I have a common ultrasonic ranger HC-SR04.  And if I go for an arm, I will use simple micro-servos. In the bottom corner is a ESP32, which would be more powerful, and provide wifi/bluetooth - perhaps for future versions.

Potential Parts for a Mini1 - Robot Minion


Alright!  Let's get started:

Mini1 - first CAD sketch - OpenSCAD

Friday, July 10, 2020

Crappy Robot Stories #1: Secondhand Love

 Crappy Robot Stories...


The front door to the shop slammed open andValk stalked through, block trench coat swirling around his ankles. He marched through the store, past the ranks of metallic soldiers standing motionless, to the counter at the back of the store. Beneath the display cabinet, rows of motherboards and semi-organic AI’s sparkled in the lights.
              Val slammed both hands down on the glass.
              “I demand a refund!” he shouted at the clerk behind the counter. Electricity sparked off of the stray white hairs that stood out in all directions from his head like a puffy cloud.
              The clerk behind the counter didn’t flinch from the sudden noise. Instead, he slowly dog-eared the page of Evil Today that he was reading before closing the magazine and laying it off to the side. Finally, he raised his bored gaze to the puffing scientist on the other side of the counter.
              “Welcome to Secondhand Evil, how can I help you today?” he intoned.
              “I demand a refund for… for… for that!” Valk shouted again, pointing behind him. As the clerk looked, a metallic head with a single eye widget poked around the villain’s back.
              “Hello,” the robot whirred. “My name is Bobs, minion robot 001.”
              “What seems to be the problem?” The clerk asked.
              “It’s supposed to be an evil robot. I specifically asked for the Villainy 2.0 software to be installed, and it hasn’t been!”
              “All our models come standard with the henchman software Villainy 2.0 installed. Why do you believe your model does not?”
              “It doesn’t do anything evil!”
              The clerk sighed and pulled a complaint form out from beneath the counter. “Can you give me some examples?” he droned.
              “I told it to prepare the lab for experiments, and it cleaned my lair. The floors are freaking sparkling!”
              The clerk looked up, one eyebrow raised.
              “I had just the right amount of evil chaos! It’s too neat now! It interferes with my evil creativity!” Valk screeched.
              Behind him, gears whirred as the cycloptic robot peeked around its owner again. “There were roaches.”
              That’s not the point!”
              “Okay, it cleaned without command. Anything else?” The clerk asked.
              “Yes! I identified a homeless man that would make the perfect minion, and I sent Bobs out to recruit him. The guy was recruited…. to an IT firm as a manager! He now makes six figures and can comfortably support his family!”
              The clerk rolled his eyes and began to scrawl on the form. “Failure to follow directive to necessary level. Anything else?”
              “He made me contribute to the middle class. I loathe the middle class!”
              “Yes, yes, I know the Evil Rulebook as well. Anything else?”
              “He’s constantly baking cupcakes. My entire lair smells like vanilla!” Valk’c chest heaved as he turned to glare at the robot.
              The clerk looked at the robot as well. Bobs held up a pink box and offered it to the clerk. He opened it up to a perfectly frosted cupcake, wrapped in a lacy doily.
              “Oookay, that’s a new one,” he said slowly. “Are they any good?”
              They’re delicious!” Valk screeched. “And they aren’t even poisoned? What kind of villainy is that?”
              “I see.” The clerk closed the box and stored it beneath the counter. He pointed up above his head, at the large sign suspended from the ceiling.
              All purchases are final. NO REFUNDS, NO EXCHANGES.
              “Oh, come on, you have to do something for me!” Valk insisted. “What about in-store credit?”
              “Nope. All sales are final. You acknowledged the risks of buying a second-hand robot when you signed the contract with us. Would you like to see your signature? I can pull up the agreement right now.”
              “I want to see your manager!”
              The clerk rolled his eyes. “I mean, I can call her if you want me too, but she said she was working on her death ray and she was going to use anyone who interrupter her as target practice.”
              Valk glared at the clerk, who stared back with the dead gaze of someone who had spent way to long in retail.
              “Fine!” he snapped, spinning around. “Bobs, we’re leaving. Se if I ever come to this stupid store again! I’m going to tell everyone how terrible the place is!”
              The robot waved one, then raced off after its master with a whirr of gears.
              The clerk sighed, shook his head, and flicked his magazine open.
              “Cupcakes,” he sighed. “Really?”


Monday, July 6, 2020

Tilt! - A Balancing Robot (#2) - Online Inspiration


There are certainly influencers that I am using while developing this idea. Here are links to their videos, libraries, and project pages.

From the Internet:

James Bruton

He is loud and British, but you have to admire his enthusiasm!


OzBot - Red

These are nice robot builds. and good inspiration and guidance.


Of course - this guy's proto-robot army.  From his 2018 blog: Electronics and Robotics.

Open Source Libraries:

I am benefiting from some OpenSource libraries

Jeff Rowberg’s  I2CDev

Brett Beauregard’s  PID Library

More General Inspiration and help:


Homofaciens project page on using Transmissive optical sensors to create DIY servos.

DroneBot Workshop video description of using the MPU-6050.  As well as a nice project page.

This looks pretty detailed too..  kas on the Arduino Forums has a nice long thread on the topic of Balancing Robots.  I certainly liked his disclaimer: 
"I invented nothing
I read A LOT and went by trial and error"