Showing posts with label Frankenstein Prototypes. Show all posts

Sunday, April 27, 2025

PolyMap & Minone: First Test Results (#4)

Simple SLAM Robot: Initial Tests with PolyMap and Minone

Both the PolyMap mapping platform and the Minone robot have reached a level of functionality sufficient for their initial tests together. The early results are exciting, though clearly revealing room for improvement—exactly as anticipated!

Here's a video capturing these very first tests. Having this visual documentation will greatly help us track the robot's progression as we refine and improve the SLAM capabilities.

Overview of the First SLAM Tests

These initial tests show how well the mapping system, PolyMap, works together with Minone, a very minimal robot platform that is built around an ESP32 microcontroller. Minone, equipped with only a single ultrasonic sensor, navigated a confined hallway environment. All communication between the robot and the mapping software was successfully managed via MQTT, demonstrating effective real-time integration.

Minone, alone in the hallway.


In this test setup, Minone was in a hallway out of my vision. My phone was recording its movement. I sat in an adjacent room behind the door and was instructing the robot through the visualization. Commands were sent using MQTT to the robot and telemetry and map data was returned as previously discussed. In this test, I did have the reassurance that it was working, as I could hear the motor movement down the hallway.

Mapping Process and Key Observations

The PolyMap visualization provided live feedback during the tests with telemetry and maps. On the map you can see:

  • Robot position was clearly indicated in orange.

  • Obstacles detected by the ultrasonic sensor appeared in red.

  • Unexplored areas remained marked in black.

  • Telemetry shows the Pose (X, Y, Θ) and state: Manual

PolyMap Viz April 2025 (Totally Not Evil Robot Army)

The visualization effectively demonstrated the system's ability to build a cohesive map from successive sensor readings. However, the tests quickly highlighted significant limitations associated with relying on a single ultrasonic sensor:

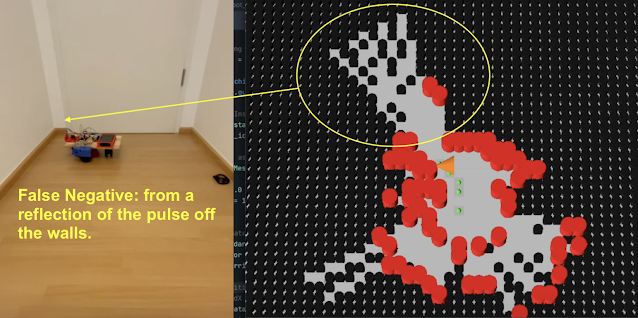
  • False negatives: The sensor occasionally failed to detect obstacles, particularly when encountering oblique angles. The pulsed ultrasonic signal reflects off the surface and does not return to the sensor, the device times out waiting, and returns a long distance (in this case greater than 170cm)

  • False positives: There were numerous instances of the sensor incorrectly registering obstacles due to noise and sensor inaccuracies. This could be due to echos, but otherwise indeterminate (for me at this time).

Minone, False Neg due to Reflection in corner.

These limitations underscore a common challenge when using ultrasonic distance sensors. In simple SLAM test, there were no special filter applied or sensor data management used. This is a clear direction for improvement in the next code iteration.
Initial Conclusions and Immediate Next Steps

The primary next step is addressing the significant number of false positive and negative readings produced by the ultrasonic sensor. To tackle this challenge, the mapping algorithm will transition from a basic binary representation (occupied/free) to a probabilistic occupancy grid, employing the log-odds methodology. This approach should significantly reduce the influence of sensor inaccuracies by statistically weighting sensor readings over time.

Looking Ahead: Introducing Mintwo and Exploring Swarms

Future development plans include building an upgraded version of Minone: the Mintwo robot (?!?). This iteration will be enhanced by incorporating multiple IR time-of-flight sensors, dramatically enriching the data quality and robustness. The improved sensory capability of Mintwo will not only enhance individual robot performance but also lay the foundational work for exploring coordinated behaviors and swarm robotics, leveraging PolyMap’s scalable and distributed architecture.

Stay tuned as we continue to iterate and enhance both the PolyMap platform and our expanding army, ehr.. family of robots!

Sunday, April 13, 2025

Minone – Getting the MV#Robot to Stable (#3)

Minone – Getting the MV#Robot to Stable (#3)

It's been a busy stretch since the last update! Many improvements, refactoring, debugging, and learning sessions have pushed the Minone MV#Robot toward a more stable and robust platform.

Code: Structure and States

Most of the recent effort has been dedicated to fleshing out software needed for remote operation. The robot's codebase has significantly expanded, particularly around the command structure. I've implemented a state model to handle essential high-level states:

  • Standby: Robot awaits commands—especially useful after a reboot, allowing manual verification before resuming tasks.

  • Manual: Direct control, crucial for immediate testing and remote operations.

  • Autonomous: Fully independent operation. Future enhancements will include advanced exploration strategies, frontier search, and swarm coordination.

  • Pause: Temporary halt; currently, the robot resumes directly into Autonomous mode.

  • Error: Safety state activated by unexpected issues.

High-level state changes are now managed via an MQTT subscriber, enabling remote state-level commands. In Manual mode, the MQTT listener also accepts individual task commands for immediate execution.

To efficiently handle robot actions ("tasks"), I developed wrapper code that allows manual triggering for debugging flexibility. Additionally, during Autonomous mode, the Robot's Agent autonomously generates tasks, utilizing the same task infrastructure.

Precise Movement Challenges

One aspect differentiating a true robot from a toy or simple remote-controlled device is the ability to move precisely. For mapping and SLAM purposes, it is crucial to know exactly where the robot is and its pose. To understand how much a motor has turned, an encoder is used to 'count' the amount of rotation. Minone uses encoders that are built into recycled Roomba wheel modules I am using. Knowing the number of pulses per rotation and wheel dimensions allows precise odometry calculations—determining how far the robot moves or rotates.

Initially, Minone exhibited incorrect odometry during turns. Calculations seemed accurate—asking to move 10cm resulted in software reports of 10cm—but the physical movement was actually 20cm. This discrepancy first appeared in rotation measurements, which were exactly half the physical result. At first, I assumed calculation errors were related to the complexity of the turn calcuation. The wheels are rotating in opposite directions and you must factor in wheelbase dimensions. A quick patch improved turn precision slightly, but the underlying movement issues remained.

Digging deeper revealed encoder pulse counts were half the expected values. Although the very specific 508.5 pulses per rotation was correct, I initially misunderstood that this value included both rising and falling edges of the encoder's square-wave pulse. A small adjustment resolved this completely:

// --- Encoder Setup ---
void setupEncoders() {
  pinMode(LEFT_ENCODER_PIN, INPUT_PULLUP);
  pinMode(RIGHT_ENCODER_PIN, INPUT_PULLUP);
  attachInterrupt(digitalPinToInterrupt(LEFT_ENCODER_PIN), leftEncoderISR, CHANGE);
  attachInterrupt(digitalPinToInterrupt(RIGHT_ENCODER_PIN), rightEncoderISR, CHANGE);
}

Switching the interrupt trigger from 'RISE' to 'CHANGE' allowed counting both edges. Problem solved! Recognizing this resolved earlier incorrect adjustments, making robot turns and movements significantly more accurate—not perfect yet, but sufficient for this prototype stage.

A cautionary note on AI-assisted coding: Unfortunately, my AI coding companion missed this nuance, underscoring the continued need to have some knowledge of what you are working with, both in code and hardware. The AI repeatedly suggested using 'RISE,' which cost significant debugging time. Only through examining code from other experienced developers—a big shout out to Bill at DroneBot Workshop—did I discover the proper approach.

Coordinate Systems & Rotational Model

Choosing a coordinate system for your robot is critical, impacting navigation, mapping, and visualization. Coordinate systems aren't always the simple math we learned in high school (traditional X/Y axes). You must consider the Z-axis for rotation and eventually 3D mapping, plus how your robot’s "frame of reference" relates to mapping standards reference. Surprisingly, industry standards differ significantly from basic Cartesian assumptions.

I selected a right-handed system (X-forward, Y-left, Z-up) for the robot frame, aligning with robotics conventions used in platforms like ROS. Positive yaw indicates counterclockwise (left) rotation, while negative yaw indicates clockwise (right) rotation. Though initially counter-intuitive, maintaining consistency across code and system interfaces is very important.

Downstream, the Map Manager and visualization components must translate these standards, especially when interfacing with game engines like Godot, which often uses a different convention.

Minone 11 APR 2025 - MV#Robot

Hardware Improvements

The prototype hardware has also been improved in this iteration. Adding a level shifter stabilized communication between components with different voltage domains. To safely power the ESP32 independently, I now directly use a clean 5V source from a power bank rather than the L298N's regulator.

Currently, the robot remains on a breadboard— a big messy rats nest of jumper wires. Future builds will transition to a safer proto-board with robust connectors for stability and better cable management, reducing risk of havoc from loose connections.

Demos: Seeing the Progress!

Here are short videos captured during the build process. The first demonstrates basic movement and scanning routines without intelligent decision-making:

The second video shows progress after foundational movements were implemented but before odometry corrections—movements rely on timing rather than accurate angle calculations. Since filming, accuracy has significantly improved!


Thanks for following along! The Minone MV#Robot journey continues—iterate, iterate, iterate!

Saturday, March 29, 2025

Minone - Starting the build (#2)

Early minone - TNERA MVP Robot

Minone Build Log #2: The Grind Begins

Minone is a Minimal Viable Robot, built as a prototype for my development of PolyMap, a multi-agent mapping system. It’s a bare-bones junkyard robot—scrapped components, an ESP32-S, and some basic electronics. And let me tell you—it’s fantastic for learning how the real physical world and the virtual one collide. And boy, does it grind.

Core Components:

  • ESP32-S dev board
  • L298N - motor driver
  • Scraped Roomba Motor Modules (with encoders)
  • HC-SR04 Ultrasonic Sensor
  • MG90 servo
  • and a 12V/5V power bank

Here is a highlevel schematic of how they are connected together:


Everything’s wired up pretty simply—and that’s where the real problems start. 😄

Voltage in and out: 3.3V vs 5V

The ESP32 runs at 3.3V logic, but nearly all my sensors are 5V devices. That means input signals need to be stepped down, which I’ve handled using voltage dividers. No big deal.

The trickier part? Outputs. The PWM signals that drive the servo, trigger the ultrasonic sensor, and control the motor driver are all a bit underpowered at 3.3V. Some devices tolerate this. The L298N? Not so much.

That means it’s time to level shift those outputs. A voltage divider doesn’t cut it here. I’ll be testing a proper level shifter soon to ensure robust 5V signaling.

PWM Resource Conflicts on the ESP32

One of the most valuable lessons so far: PWM timers and channels are limited and easily conflicted.

At first, I had a nice ultrasonic sweep working via the servo—classic radar style. But after I added the motor drivers and encoder logic, the servo went haywire. High-pitched whining, jittering, and eventually… nothing.

What happened?

Turns out, the servo and motor driver were fighting over the same PWM channels. The servo took channel 0 by default. The motor driver was hardcoded to use channels 0 and 1. This conflicted both the frequency (servo at 50Hz, motor at 5kHz) and the timer allocations.

My first fix: reorder the initializations to let the servo grab a channel first. This helped, but wasn’t enough.

The real fix: manually assign a separate timer and channel to the servo. I dedicated timer 1 / channel 2 for the servo just before attaching its pin. That separated its timing cleanly from the motors—and everything started playing nicely again.

It cost me a bit of time, but the lesson was well worth it: don’t assume PWM resources will sort themselves out.

The Mysterious Unbootable EPS32

When shifting to local (robot power), Minone just… refused to boot. No errors, no logs—just silence. After way too much head-scratching, I finally pulled out the multimeter and discovered the culprit: the L298N motor driver was holding GPIO 12 and 15 high on startup. Turns out, those pins are a bit picky—they must be low for the ESP32 to boot.

No amount of code, pull-downs, or wishful thinking could override the voltage being held by the motor driver’s enable pins. The only fix? Move those signals to different GPIOs. I ended up switching to GPIO 19 and 22, and just like that—boot restored.

Sometimes, it’s not a bug—it’s physics.

A note about "Vibe Coding"

Throughout the development of Minone (and PolyMap), I’ve leaned heavily on LLM-based AI to guide the process—something the industry is starting to call Vibe Coding. As many have noted, Vibe Coding is a fast way to build software that might otherwise be just out of reach. And honestly? I recommend it, but not for beginners to coding.  [Update: Vibe Coding now has negative connotations. What I recommend is using it as a tool, not over dependence on it.]

AI has helped me rapidly prototype, implement features, and solve specific technical challenges. But beware—it’s not all smooth sailing.

Where AI shines is in writing clean, functional code based on known patterns. It’s excellent at pulling in details, explaining APIs, and even suggesting optimizations. But it often struggles with the human side of development—especially incremental development, integrating features, and aligning with the developer’s mental model.

A big part of my time is still spent going back through generated code line-by-line, trying to understand what it’s doing and whether it matches what I need it to do.

There are also assumptions—sometimes wrong ones. For example, in my code, the AI assumed the encoders were infrared-based, when in reality they’re Hall effect sensors. It’s up to the developer to catch those mismatches and feed corrections back into the conversation. Once pointed out, the AI adjusts quickly, but it doesn’t ask enough questions up front to avoid such errors.

Another example: determining the number of pulses per revolution from these old Roomba motors. This spec isn’t widely documented, and the AI couldn’t give a definitive answer. I had to dig through old boards and obscure web forums to figure it out.

The takeaway? AI is an incredible tool—but the human still needs vision, intuition, and a working understanding of how systems should behave. We’re closer than ever, but not quite at full autopilot.

Incremental Robot Development: ✅ Turning left 

Here’s a quick one: I connected one of the motors directly to the battery—pure chaos, purely intentional. 😄

Sure, it was just to confirm the motor worked. But from a test-first, incremental development perspective? We can officially check off:

✅ Turning left.

Progress!

State of the Platform

Minone is now stable. The essentials—WiFi, MQTT, sensor reads, sweeps, motor movement, and encoder feedback—are all working together smoothly.

The platform’s ready for the next steps:

  • Fully Integrated into the Godot visualization
  • A much much more curious Robot Agent
  • Mapping the basement hallway - the Testing Goal

Wednesday, February 19, 2025

Minone - Introduction of my MVP Robot for SLAM Exploration

Exploring Robots are cool. Robots that map their surroundings? Even cooler. But there’s a massive difference between slapping together a chassis and motors and actually building a robot that can autonomously explore and create a map of its environment. That’s the problem I’m setting out to tackle with Minone, my MVP (Minimum Viable Prototype) for an exploration-focused robot.

Minone - MVP for SLAM

Why Start Simple?

Most SLAM (Simultaneous Localization and Mapping) discussions dive straight into complex sensor suites—LiDAR, stereo cameras, high-end IMUs—but I’m deliberately taking the opposite approach. Instead of relying on fancy hardware, Minone is built to push the limits of simple sensors, starting with nothing more than an ultrasonic distance sensor (HC-SR04).

Why? Because understanding SLAM at its core—filtering noisy sensor data, estimating position, and reconstructing an environment—is much more valuable than just plugging in a high-end sensor and hoping for magic. I want to see how much useful data I can extract from the bare minimum before moving on to more advanced solutions.

A Scrap Yard Robot

In true MVP fashion, I built Minone from whatever I had lying around:

  • Chassis: The top of an old wine box. (Recycling counts as engineering, right?)
  • Motors: Two Roomba drive motors salvaged from an old unit.
  • Caster Wheel: From a trashed suitcase. (Turns out, old luggage makes for decent robot parts.)

It’s the ultimate scrap yard robot, which makes it easy to modify as I iterate. That’s already proving useful, since I’m starting to regret my choice of a trailing caster wheel—turning is fine, but the bot has a tendency to tip forward. A problem for Future Me to solve.

Electronics & Control

For brains and motion control, I’m using:

  • Microcontroller: ESP-32S
  • Motor Driver: L298N H-Bridge

This will be my first time working with an ESP-32S, so I’m looking forward to seeing how it handles real-time sensor inputs and motor control. The L298N should manage the Roomba motors' voltage needs just fine (in theory, at least).

The Underpowered Sensor Challenge

The HC-SR04 ultrasonic sensor is laughably weak for proper SLAM. It’s low-resolution, has a narrow field of view, and struggles with certain surfaces. But that’s exactly why I’m using it—I want to figure out how to make the most of bad data.

If I can extract meaningful spatial information from this absolute potato of a sensor, then adding better sensors later (IR, TOF, LiDAR) will only make the system stronger.

What’s Next?

With the basic hardware in place, the next steps will be:

  1. Getting Minone moving – Setting up basic motor control with the ESP-32S and L298N.
  2. Reading sensor data – Making sure the HC-SR04 is providing usable distance measurements.
  3. Starting simple SLAM tests – Even basic dead reckoning will be a good first step.

As I build and test, I’ll be refining Minone’s design—possibly rethinking that caster wheel before it faceplants one too many times.

Stay tuned for the next update! 🚀

Sunday, June 23, 2024

Mojo5 - Enhancing Performance with More Powerful Batteries (11)


Mojo5 - with power bank battery

Welcome back to the "Totally Not Evil Robot Army" blog. In this 11th installment of the Mojo5 series, we’re going to dive into a crucial aspect of building robust quadruped robots: using more powerful batteries to drive hobby servos. Specifically, we'll explore how increasing the available amperage and voltage can significantly improve the performance of underpowered servos and the considerations needed to ensure safe and efficient operation.

The Problem with Underpowered Servos

Building a quadruped robot like Mojo5 with cheap hobby servos often leads to performance issues. Many of these servos, such as the MG995, are slow and lack the torque needed for dynamic movements. Even with a 5V power supply, these servos can become wobbly and unreliable, especially under load. This is where upgrading to more powerful batteries comes into play.

The Limitations of the Original Power Configuration

Initially, Mojo5 used a 5V 12000mAh power bank. While this power source had a high capacity, it was limited to a maximum output of 3A. Given that the MG995 servos have a stall current rating of up to 3A each, the total current demand for the robot could easily exceed 20A during peak operation. This significant shortfall in available current was a primary cause of the robot's poor performance.

Upgrading the Power Source: LiPo Batteries

Based on previous discussions and experiments, we found that using a more powerful battery can drastically improve servo performance. Upgrading to a LiPo battery with a 2200mAh capacity, 7.4V voltage, and a 50C discharge rating provides the needed boost. This battery can supply well over the 20A needed by the servos, addressing the current limitations of the previous power source.

Considerations for Over-Volting

  1. Risk of Burnout: Exceeding the servo’s voltage rating does carry a risk of burnout. However, anecdotal evidence suggests that slight over-volting is generally safe if monitored properly. Implementing a voltage regulator could limit the current capacity, which might be counterproductive. In general voltage regulators on servo power sources are not recommended.

  2. Separate Circuits for Different Servos: For servos with lower voltage ratings, such as the MG90 (max 6V), consider creating a separate circuit to avoid over-volting. This will add an additional circuit which can be problematic. For my experiments with Mojo5, I used the same circuit.

Practical Application: Experimenting

Initial Setup

  1. Battery Connection: Connect the 7.4V 50C LiPo battery directly to the power bus of the PCA9685 servo driver, bypassing capacitors and regulators. This setup ensures the servos receive power directly.

  2. Handling Large Wires: Safely connecting XT-60 battery connectors and their thick 12 AWG wires to smaller electronics is challenging. Using a bare copper PCB or prototyping PCBs with multiple copper lines can provide a more robust connection. Soldering all wires together is an ugly but space-efficient solution.


Not Recommended!


In this experiment, I took the short cut and soldered the large wires directly in to a dupont connector. The connector was connected directly to the servo bus. This is not a recommended practice! I better connection with larger wires is recommended. In this particular case, as long as all of the servo motors do not stall, then only brief seconds of +20A current would be expected.  Current greater than 7A for sustained periods of time would destroy the connectors.

Experiment Results

After connecting the 7.4V battery:

  • Servo Performance: There was a noticeable improvement in servo actuation. The MG995 servos operated better, with no immediate burnout.
  • Heat Management: Monitoring the temperature of connectors and wires is crucial. Using a finger-test method (keeping fingers on components for one minute) can help identify safe current levels. If components become too hot to touch, reduce the current.

To visualize the improvement, I have embedded a short video showing Mojo5's performance with the original 5V power bank versus the upgraded 7.4V LiPo battery. Notice the difference in servo response time and stability.


Long-Term Solutions

While the initial experiments are promising, long-term solutions require more robust hardware:

  1. Custom Servo Driver Board: Developing a servo driver board with better connectors and thicker traces can handle higher currents more efficiently. This would replace the PCA9685 board, which is not designed for high current loads.
  2. Current Monitoring: Implementing current measurements and safety features like e-fuses can prevent overcurrent situations and protect your components.

Conclusion

Upgrading to more powerful batteries can significantly enhance the performance of underpowered servos in your DIY robots. While there are risks associated with over-volting, careful monitoring and proper hardware can mitigate these risks. As we continue to push the boundaries of DIY robotics, sharing these experiences and solutions will help us all build more capable and reliable robots.

Saturday, July 29, 2023

Mojo5 - First concepts and Franken-prototype (#2)

Mojo5: Building a New Robot!

To kick off the design process, the main concept behind Mojo5 was to closely bind the servos together while using an unconventional material – chopsticks(!) – to create a minimalistic chassis.

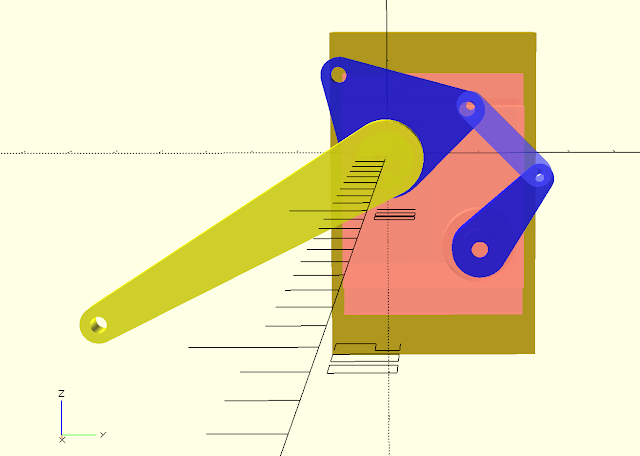
Initial CAD Drawings:

The journey started with creating initial CAD drawings to visualize the robot's structure and mechanics.

Servo mount is binding the two leg servos together

(Blue) knee servo arm, linkage, and co-axial cam
(Yello) Upper-Leg also co-axial, servo connected

Microcontroller and Servo Driver:

For Mojo5, a major change was adopting the ESP32 controller instead of the simpler Arduino mini-pro used in previous Mojo variants. The ESP32 provides added functionality, including built-in Wi-Fi and Bluetooth connectivity, and ample I/O pins to accommodate future expansions.

Mojo5: ESP32 Micro-controller connected to PCA9586 Servo Driver


To drive the servos, I chose the PCA9685 servo driver, utilizing I2C communications. Although my existing 11kg servos are not the most powerful, the PCA9685 still manages to control them effectively. Furthermore, my familiarity with this driver makes it a suitable choice for use with the ESP32.


The Franken-Prototype:

To quickly test the concept feasibility, an initial prototype was assembled. It consisted of a newly designed 'upper-leg' or 'femur' and a knee-cam sharing the same axis as the upper-leg. Other parts were recycled from earlier robots, giving birth to what we affectionately call a 'franken-prototype'. Franken-prototyping is a common and pragmatic approach to quickly determining the feasibility of an idea.

The first test was crucial – connecting the servos to the PCA9685 and ESP32. I taped the servos together and assembled the required components. Powering the system with a 5V source, I eagerly sought to witness the initial motion and validate the success of this build. And to my delight, it worked! This promising outcome lays a solid foundation for the upcoming design iterations.

Mojo5: Franken-Prototype

In addition to the Prototype, I was able to set up a new repository for the Mojo5 code, and test out the basic set up, communications, and loops.

With Mojo5's initial movements validated, I'm excited to delve deeper into refining and enhancing its capabilities for even greater achievements in the future!

Sunday, September 11, 2022

Runner Robot (#1)

I am search of a fast running quadruped (so that I can compete in the Toulouse Robot Races).  I am considering this running mechanism and driving it with a single brushed motor.

This mechanism has worked or others in scholarly papers. I am doing a number of modifications to try to get it to work in a quadruped format.

Robot Runner - Robot leg mechanism

My initial prototype has provided a feasible solution. The mechanism should be able to provide a good profile for walking. I have added some compliancy to provide additional ground contact. From the picutre you can see some of the lengths I have tried for the various linkages. By adjusting these lengths, you can change the step profile.  A profile that has enough rise, and forward movement is desired.

Here is a video of the movements:


The mechanism works well enough in a 2-D plane. This also could have been simulated in programs like Algodoo.  

Next is a tricky issue, the robot will encounter a lot of side loads. Now the mechanism must be designed to reduce the stress of the sideload and transfer (as much as possible) to the chassis of the robot. The image below shows how 'skinny' the "2-D prototype" was.

Side view of the Running mechanism


Follow along to see the progress!

Saturday, January 15, 2022

Mojo4 - a little design cleanup (#5)

 Mojo4 has regressed in its ability to shuffle across the floor, unfortunately.  This regression could be due to various causes. I have some concerns over the battery current and the condition of the battery given the temperatures and current. It is also obvious to me that the 'Franken-Prototype' nature is having an impact on the testing of the robot.  It seems that the franken-prototype has taken the design as far as it can go, and an upgrade is necessary to continue forward.  on to --

Mojo4 - Robot is a mess, it needs a better frame or chassis

De-Frankensteining

the majority of the robot is currently built with reused pieces. The is due to the focus being on testing how viable the legs will be for walking.  Having (somewhat) proved this, the next steps need to have a more reliable robot platform.  First on the list is to secure the 4 leg units with a better frame or chassis.  I would like to do this in a way that any new parts, will be used in the future robot (as much as possible).

I will create some Frame Sections that will separate the leg modules, a provide a more stable chassis.  Notice how the right side leg modules are actually not aligned with the rest of the robot - this will certainly have impact to the ability to have a precision walk. 

Backward compatible - should not exist as a design constraint of a NEW robot in the prototype stage! But the question comes to mind.  In order to only build the parts I need, I would need to ensure that the new replacement part fit the same configuration of the existing parts. This mean that the new part is 'backward compatible' with the older part.  This, however, wold be a design sin at this stage. It would limit the innovation of the future robot, tying it needlessly to an obsolete part.  

One note, since my parts tend to have regular 10mm spaced holes for M3 bolts, it does provide a lot of reuse potential.  Unfortunately, i found that my previous designs, I was less concerned with 'standard' parts; therefore many of my old parts do not have regular dimensions (around the rounded cm values). This has limited my ability to reuse.  Going forward I will be more careful to make sure parts I design fit into somewhat regular dimensions.

Frame Section:

I have designed a frame part that will help construct the prototype, while also being a useful part for the future build.  This Frame Section is a box of 10cm x 6cm x 4cm dimensions. It will have M3 holes on the outside and a basic 'floor' for holding components (battery box, or Micro controller).

Frame Section - useful and reusable building component

If I print out 3-4 of these, then I can replace most of the frankenstein-prototype parts used to hold the leg modules in place.  This should provide a more robot platform for testing the basic gait and servo strength.


Saturday, December 18, 2021

Mojo4 - Additional Details (#4)

Here are some more details of Mojo4 - Quadruped Robot Dog

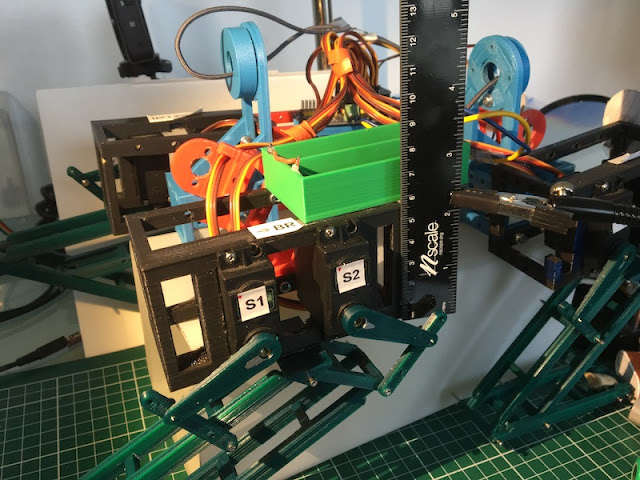
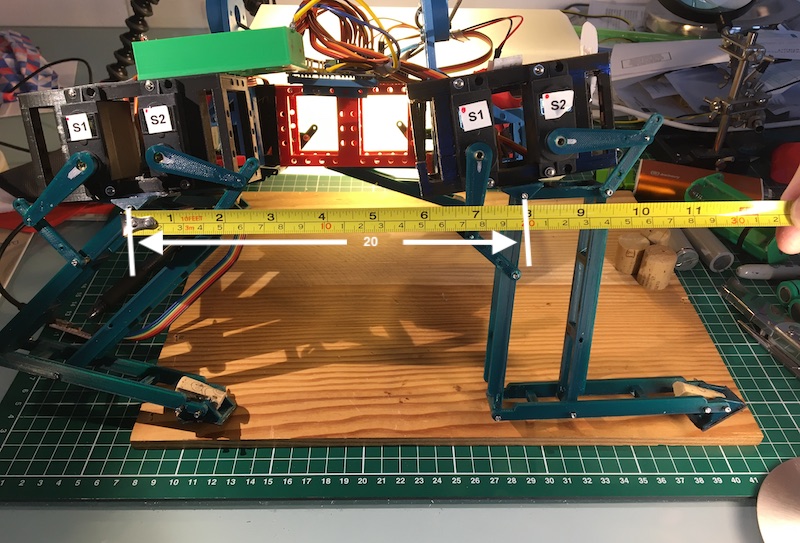
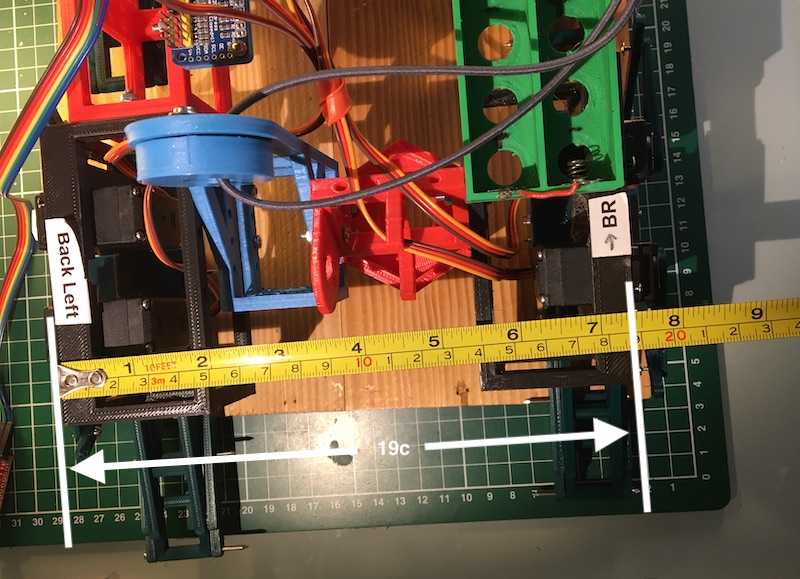
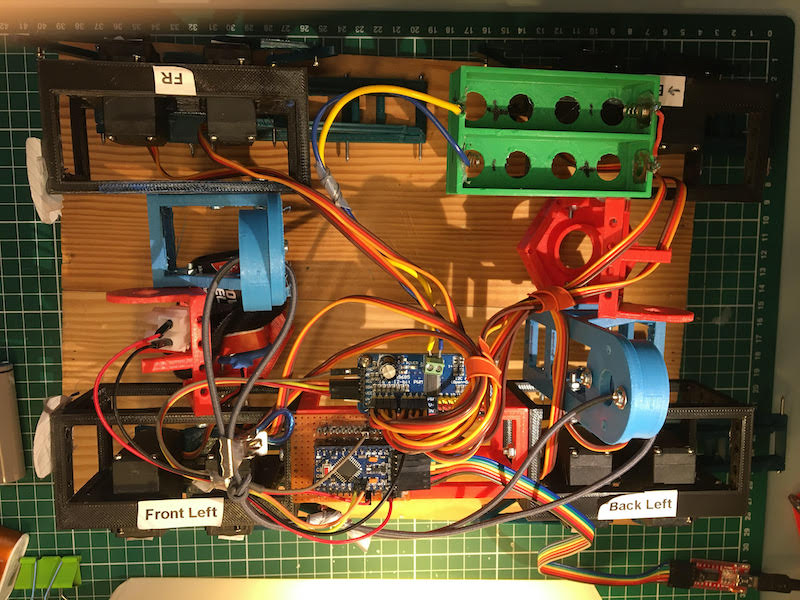
  NOTE:  This is a FRANKENSTEIN Prototype. ;)   it is built mostly with reused 3D printed parts. All of the Dark Green Leg parts were printed so that I could experiment with the 5-Bar design.  Everything else is reused or scrap from previous projects.  This includes the black frames used to mount the servo motors.  My plan is that once this is walking, I will start printing a new chassis with my new-found experiences, also to add the 12DoF.  But first this one must walk.


Here are the pictures:


mojo4-length-18dEC.JPG
Length - measured from the pivot points:


mojo4-width-18dec.JPG
Mojo4 - Width measured on outside legs


Top - Yes, this collection of PLA is a mess.  

Electronics:  Arduino Pro Mini clone, PCA9685 servo driver, and battery box. 


The 4 servo boxes are on the sides all held together by random parts that fit, bolted together by M3 screws and nuts, some super glue, and hot glue.  Somewhere in there is a 9V battery for the microcontroller, there is a small power switch on the mounting board.


mojo4-top-18Dec.jpeg


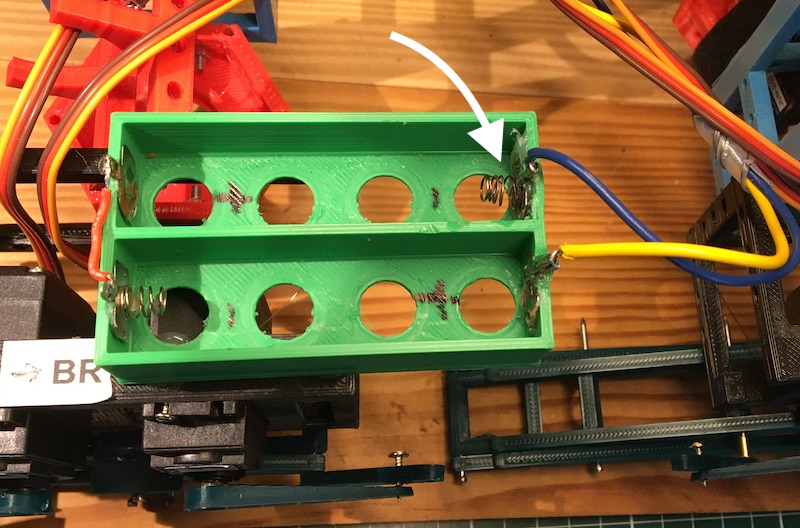
Battery Box:  3D printed, for 2x 18650 batteries. I reused the spring contacts from small toys.  This is a problem since the spring that I have highlighted with an arrow can not handle the current of the batteries and heats up (to the point of melting the hot glue holding it in place).  something else to fix. ;)


mojo4-battery-box.JPG
3D Printed Battery Box for 2x 18650 batteries


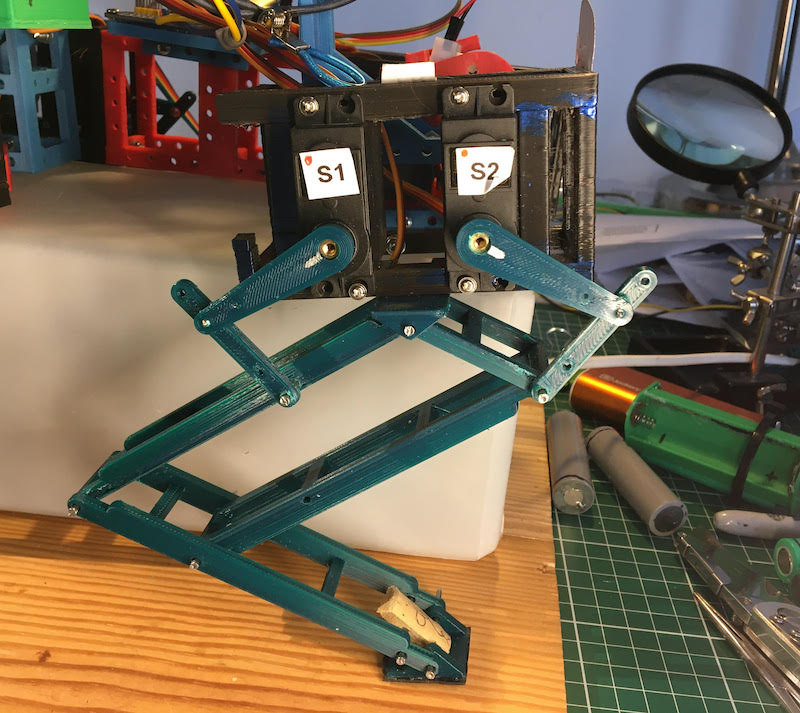
Here is a picture of the leg configuration.  3D printed, minimal material.  It has been strengthen (i made it thicker) to prevent bending. The pivot points are small common nails placed into tubular channels in the leg components. a very cheap easy way of making a hinge. The paw needs a new design.  the current version is 3D printed, has rubber on the bottom, and part of a wine cork to hold it in place.  reuse!  ;)


mojo4-leg-18Dec.jpeg
Mojo4 - 5bar quadruped robot leg


Sunday, December 12, 2021

Mojo4 - Stable Walk Testing (#3)

 Mojo4 - the Quadruped Robot Dog - is now undergoing some very basic walking tests.  Here you can see a video of one of the attempts.  There have been a number of issues found:

- Width - much wider now

- Current Draw from battery, is heading up the 'spring' used to hold the rechargeable batteries in place.

- Feet, getting the right grip

- Leg positioning.  Hind legs back, front legs more forward

- Basic gait, perhaps raise the legs up a little more on the return

Video:


Thursday, December 2, 2021

Mojo4 - Half-a-Robot-Dog! (#2)

 Quick Update - Mojo4 is coming right along. I have a lot post about.  But, for now I will just share this quick video.

video: 1/2 of Mojo4


Over the last weeks, my focus has been on the Inverse Kinematics, I will post more about this shortly.  When I had success with the above Half-Dog, i ran into an issue with the Voltage and Current of the servos when used together.  I have just solve this issue and will also follow up with my learnings.

In the mean time, enjoy the video. And, fingers crossed, will have something more to show shortly.

Monday, November 8, 2021

Mojo4 - 5bar design (#1)

Time for A new Mojo Design!  Time to get back in to the wonderful world of Quadrupeds!

I am trying out a new design approach for a new Quadruped.  The 5-bar linkage.  

This approach has been successful in several quadruped designs found on the internet. (one of my favorite is by Oracid: video.) 

It has a full range of motion with only requiring only 2 servos per leg. in addition the leg linkages are supported by pin/hinges on the frame. This should reduce, but not eliminate the force exerted on the servo motors.

Linkages are just mechanical arrangements of bars/links/connectors and pivoting connections. Given different types of configurations, it is possible to get a wide range of applications. One of the most common linkage people have seen on old steam engines. Here, the steam exerts a linear force that is then converted to a rotational force to move the trains wheels.

For a 5 bar linkage, only two bars are connected to the servos. by changing the angle on just these two servos, one can get a wide range of motion.

By I.Elgamal - Own work, CC BY-SA 4.0

For my design, I will be connecting the top two pivot points together to create a 'diamond' of the linkages.  next, at the bottom, the bar is extended further out. Here is where the 'paw' will be connected.

5 Bar Linkage in a diamond with 'paw' configuration

I am hoping that this arrangement of parts should provide significantly more vertical lift in the leg. Mojo2 did not have significant lift and often shuffled.  Also, Mojo3 had more left control, but the servos were overpowered. This combination should provide both the needed strength and lift required.

To control the leg, the two servos will be connected in smaller 4 bar connection to the sides of the Diamond. The key in the design is to keep the servo horns parallel to the bars that they control. In operations, the servos themselves act virtually identical to the top diamonds sides.

Mojo4 Robot Leg design with control actuators

The linkage parts will be 3D printed (of course) and I will be using a small nail as the hinge.  This hinge arrangement is very similar to the track design I used on the Wild Weasel. (video)  Having a reliable design in the CAD and 3D printing makes building robots a lot easier. With this design I can remove a freshly printed part and assemble it with only basic smoothing and cleaning.


For my first rapid prototype testing, I will only have a test stand to validate the movement of the leg. I am re-using parts and the wiring from Mojo2.  I will reuse the Mojo2 servos, MG995 servos. These are 13kg servos. They are slightly heavy for this application at 65g.

Here is what the constructed leg mechanism looks like:

Mojo4 Robot Test Leg

Next Steps:
Now that the basic structure is printed and built for the 'test stand'. I will work on the software to move the leg. For this robot, and the first for Mojo, I will implement some form of Inverse Kinematics. With Inverse Kinematics, it will be possible to instruct the leg the exact position it should talke, and the IK will determine the correct angles to command to the servos.

Saturday, September 26, 2020

Milli (#9) - New Mount for Helix - and Crawling Video!

 Milli - a Bio/Math inspired crawling single actuator robot millipede - now with teeth!

Milli - Millipede robot - now with teeth

From the last post, you may have noticed that I had tried to print some "nodes" as a possible improvement to Milli the millipede. Well, that thought was not as successful as I had hoped. There turned out to be no flexibility and too much tension on the helix. With this in mind, I reopened the milli design and set to work on some design updates:

  • Offset the motor
  • add a gear reduction to the motor
  • add a bearing to main helix mount - to remove force on the motor itself
  • try out a new power source
  • Add teeth - because we need to add more Nightmare Fuel!!
CAD Design - new Motor Mount and Gear


The new design is a new motor mount, with drive gear, a bearing mounted main gear, and new 12V "shore" power.

3D printing gears remains a dark art to me, but here you can see that they are functional. In this print, I have used a larger Modul of 1.5, this makes larger teeth. I believe for my quick 3D prints this is a more accommodating solution (more tolerance for rough prints!).


I applied a liberal amount of hot glue to attach the pre-existing helix mount to the newly printed main gear. That may qualify this for a frankenstein prototype, no doubt.


Sloppy gears? certainly room for improvement - on the next iteration.  The thicker base layer print creates an uneven gear surface.

Another issue was the 'pede wheels' that I kept from the previous build. They function as wheels, however in the video you can see that the left wheel consistently unwinds and falls off, Doh!

Ready to Test!  Let's get crawling!


Milli - Robot Millipede on a colorful background


For this round of testing, I am using "shore power". The robot is tethered to a 12V DC source. I reused a momentary switch - also from a printer - in order to easily turn on and off the robot.

Testing goes as expected.  The motor gear hold, which is surprising.  However the front left pede-wheel falls off frequently.  The motion of the helix, continues to be smooth.  I believe the addition of the bearing smooth this rotation off, taking load off the motor.  

Video on YouTube:


Next Steps:


With this success, time to think of what would be in the next iteration.
  • Onboard 12V power supply
  • micro-controller with PWM output
  • Motor Driver board
  • remote or autonomous operation (Min1 project may come first)